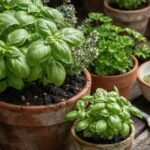

Key Takeaways
- The ideal pesto pot combines at least three basil types — large-leaf Genovese for sauce base, a purple variety for visual contrast and vinegar infusions, and a compact dwarf for front edging — all in a single container minimum 23 inches wide and 9 inches deep.
- Full sun (6–8 hours daily) is non-negotiable: basil below this threshold bolts faster, produces fewer essential oils, and develops off-flavors that ruin fresh pesto.
- Harvest by pinching above a leaf node every 7–10 days to prevent flowering, maintain essential oil concentration, and extend the productive season by 6–8 weeks.
- Core materials needed: large container with drainage holes, premium well-draining potting mix, slow-release organic granular fertilizer, and established transplants (not seed-started) from 2- or 4-inch nursery pots for fastest results.
The Plant Pot Pesto Garden: A Complete Technical Guide
There is a specific moment every summer when a pot of basil transforms from a decoration into a genuine kitchen workhorse. That moment arrives when you understand that a designed basil container — one built with deliberate cultivar selection, correct soil architecture, and a disciplined harvest protocol — produces yields that single-variety pots simply cannot match. This guide gives you the full technical picture: cultivar science, container engineering, soil chemistry, fertilization strategy, and a harvest-to-pesto workflow that treats the plant with the biological respect it deserves.
Why a Multi-Cultivar Pesto Pot Outperforms a Single-Variety Planting
Ocimum basilicum is not a monolith. The species encompasses more than 150 documented cultivars with meaningfully different essential oil profiles, leaf morphologies, growth habits, and culinary applications. When you design a pesto pot around cultivar diversity, you are not just making the container prettier — you are engineering a layered flavor system.
The primary workhorse cultivars for this container fall into three functional categories:
Category 1 — The Pesto Base (Large-Leaf Genovese Types)
‘Profuma di Genova’ and ‘Sweet Genovese’ are the backbone of authentic Italian pesto. Their large, slightly convex leaves carry high concentrations of linalool and eugenol — the aromatic compounds responsible for that classic sweet, clove-adjacent basil scent. These varieties have a naturally low camphor content, which is what separates a silky pesto from one with a harsh, medicinal edge. Plant these three-deep toward the rear of your container where they will receive maximum vertical space (they reach 18–24 inches at maturity).
Category 2 — The Accent Basil (Purple/Red Varieties)
‘Red Rubin’ contains elevated anthocyanin concentrations that give it both its deep burgundy color and its noticeably spicier, more pungent aromatic profile. This is due to a higher proportion of chavicol and methyl chavicol in its essential oil fraction compared to sweet green types. ‘Red Rubin’ is not your primary pesto basil — its flavor is too assertive in large quantities — but it earns its position as a salad basil, a stunning visual anchor in the container’s midzone, and the foundational ingredient for basil-infused red wine vinegar.
Category 3 — The Compact Front Edging (Dwarf/Windowbox Types)
‘Windowbox’ and similar compact varieties (sometimes sold as ‘Spicy Globe’ or ‘Fino Verde’) max out at 6–9 inches. Their tiny, densely packed leaves are intensely flavored per gram of leaf tissue — excellent for finishing sauces, sprinkling over fish, or making tablespoon-scale fresh pesto when you need only a small amount. Their compact habit prevents them from shading neighboring plants when placed along the front edge of the container.

Container Engineering: The Technical Specifications That Actually Matter
The container is not merely a vessel — it is a root environment, a thermal mass, and a drainage system. Each specification affects plant performance directly.
Minimum Dimensions
A 23-inch-wide container with at least 9 inches of depth is the functional floor for an 8-plant mixed basil design. The width accommodates the lateral root spread of large Genovese types without crowding. The 9-inch depth prevents the rapid moisture cycling (wet-dry-wet-dry at extreme swings) that triggers premature bolting.
Material Considerations
Terracotta is the traditional choice and remains technically excellent — its porosity allows gas exchange through the sidewalls and prevents the anaerobic root zone conditions that plastic can create in hot weather. The tradeoff is weight and moisture loss: a 23-inch terracotta pot dries faster than a comparable resin container, requiring more frequent irrigation. For rooftop or balcony installations where weight is a structural concern, high-quality UV-stabilized resin pots are a practical alternative. For readers designing container gardens in urban settings, this connects closely to the broader principles covered in Eco Friendly Planters For A Sustainable Indoor Garden, where material choice intersects with both plant health and environmental impact.
Drainage
Non-negotiable: multiple drainage holes at the container base. Basil is extraordinarily sensitive to waterlogged conditions — Phytophthora and Pythium root rots establish within 48–72 hours in saturated media. Do not place a saucer under an outdoor pesto pot unless you are emptying it after every rain event. For containers on sealed surfaces, use pot feet to ensure clearance.
Soil Architecture: What Goes Into the Container and Why
Generic potting soil from a discount retailer is the single fastest way to undermine a beautifully designed basil container. The right medium needs to accomplish three things simultaneously: retain adequate moisture between waterings, drain freely to prevent anaerobic zones, and provide a pH environment within the narrow band where basil nutrient uptake is optimized.
Recommended Mix Architecture
Start with a high-quality professional potting mix (look for composted bark, peat or coco coir, and perlite as primary components) and amend as follows:
- Add 20–25% additional perlite by volume to increase macro-porosity and drainage speed
- Incorporate 1–2 inches of mature compost in the lower third of the pot to support the microbial community that makes nutrients bioavailable
- Work in an organic granular slow-release fertilizer (balanced NPK, roughly 5-5-5 or similar) at the manufacturer’s recommended rate for container volume
Soil pH Target
Basil performs optimally at a pH of 6.0–7.0, with the sweet spot between 6.2 and 6.8. Outside this window, micronutrient lockout begins — particularly iron and manganese — manifesting as interveinal chlorosis on young leaves. If your water source is alkaline (common in many municipal systems), periodically water with a slightly acidified solution or monitor soil pH seasonally with a reliable probe meter.
The Basil Cultivar Selection and Sourcing Matrix
| Cultivar | Type | Mature Height | Flavor Profile | Primary Use | ESO Dominant Compound | Sourcing Notes |
|---|---|---|---|---|---|---|
| ‘Profuma di Genova’ | Large-leaf Genovese | 18–24 in | Sweet, floral, low camphor | Pesto base, fresh | Linalool dominant | Renee’s Garden, specialty nurseries |
| ‘Sweet Genovese’ | Large-leaf Genovese | 18–22 in | Classic sweet basil | Pesto base, caprese | Linalool + eugenol | Widely available at nurseries |
| ‘Red Rubin’ | Purple/ornamental | 16–20 in | Spicy, pungent, anise notes | Salads, infused vinegar, accent | Methyl chavicol elevated | Territorial Seed Company, online seed suppliers |
| ‘Dark Opal’ | Purple/ornamental | 14–18 in | Bold, clove-like | Salads, garnish, visual contrast | Eugenol dominant | Specialty seed catalogs |
| ‘Windowbox’ | Compact dwarf | 6–9 in | Intense, concentrated sweet | Sauce finishing, fish, small-batch pesto | Linalool concentrated | Renee’s Garden |
| ‘Spicy Globe’ | Compact dwarf | 8–12 in | Peppery, dense | Edging, garnish, small-batch fresh use | Chavicol + linalool | Widely available |
| ‘Fino Verde’ | Compact dwarf | 8–10 in | Fine, sweet, traditional Italian | Pasta, pizza, finishing | Linalool dominant | Specialty Italian seed sources |
Planting Protocol: Step-by-Step Technical Execution
Step 1 — Site Selection
Position the container where it receives a minimum of 6 hours of direct sun, with 8 hours as the ideal. South or southwest-facing exposures in the Northern Hemisphere provide the most consistent solar input. Avoid placing directly against a north-facing wall or under a deep overhang. If you are working on a rooftop or balcony, note that reflective surfaces can raise ambient temperatures around the container — beneficial in early season, potentially stressful in peak summer heat above 95°F (35°C).
Step 2 — Pot Preparation
Cover drainage holes with a small piece of window screen mesh (not gravel or pot shards — these can actually impede drainage by creating a perched water table effect). Fill to within 3 inches of the rim with your amended potting mix. Do not pack — basil roots need friable media.
Step 3 — Fertilizer Incorporation
Work granular slow-release organic fertilizer into the top 4 inches of media at the recommended rate. For a 23-inch container, this is typically 2–3 tablespoons of a 5-5-5 product. Organic slow-release formulations (feather meal, bone meal, kelp meal blends) feed the soil microbiome as well as the plants directly — a meaningful advantage over synthetic quick-release granules in a biologically active container.
Step 4 — Transplanting
Remove seedlings from nursery pots by squeezing the sides gently and sliding them out — never pull by the stem. If the rootball is tightly wound, gently loosen the outer quarter-inch of roots with your fingers before planting. This prevents circling roots from continuing to coil in the new pot. Set transplants so the top of their rootball sits approximately 1 inch below the pot rim. This geometry allows water to pool briefly at the surface during irrigation rather than running off immediately.
Spatial Layout (for 8 plants in a 23-inch round container):
– Rear arc (3 plants): Large-leaf Genovese types spaced 6–7 inches apart
– Middle arc (2 plants): Purple variety at center-left and center-right
– Front arc (3 plants): Compact dwarf types, 4–5 inches apart
Step 5 — Initial Watering
Water deeply until water drains freely from the bottom holes. Allow the surface to dry slightly between the first and second watering — this encourages roots to search downward into the media rather than staying near the surface.

Watering Schedule Matrix: The Most Critical Variable in Container Basil
Inconsistent watering is the leading cause of container basil failure — not pests, not disease, not poor soil. The following matrix provides irrigation guidelines calibrated to real-world conditions:
| Season / Temperature Range | Container Type | Typical Watering Frequency | Soil Moisture Target | Key Risk |
|---|---|---|---|---|
| Early Spring (50–65°F / 10–18°C) | Terracotta | Every 3–4 days | Moist, not saturated | Root rot in cold, wet conditions |
| Early Spring (50–65°F / 10–18°C) | Resin/plastic | Every 4–6 days | Moist, not saturated | Overwatering risk higher |
| Peak Summer (80–95°F / 27–35°C) | Terracotta | Daily or every other day | Consistently moist | Drought stress triggers bolting |
| Peak Summer (80–95°F / 27–35°C) | Resin/plastic | Every 2–3 days | Consistently moist | Heat-induced bolting in compact types |
| Late Summer (70–80°F / 21–27°C) | Terracotta | Every 2–3 days | Allow surface to dry between waterings | End-of-season leaf spot fungal issues |
| Late Summer (70–80°F / 21–27°C) | Resin/plastic | Every 3–4 days | Allow surface to dry between waterings | Same |
| Heatwave Event (>95°F / >35°C) | Any | Daily, possibly twice | Never allow wilting | Rapid bolting, leaf scorch |
The Finger Test Protocol: Insert your index finger 2 inches into the soil. If it comes out dry, water thoroughly. If it comes out with moist soil particles clinging to it, wait another 24 hours. This method is more reliable than any scheduled watering protocol because it accounts for actual evapotranspiration rates rather than calendar averages.
Fertilization: The Ongoing Program After Planting
The granular fertilizer incorporated at planting provides a baseline of 3–4 months of slow nutrition in most formulations. However, container basil grown for active harvest is a high-demand crop — it is being continuously cut back, stimulating regrowth that requires nitrogen in particular.
Supplemental Feeding Schedule:
– Every 3–4 weeks: Apply a liquid organic fertilizer (fish emulsion or seaweed-based, 2-3-1 NPK or similar) at half the label rate. This provides a soluble nitrogen flush that supports the rapid regrowth following harvest.
– Avoid high-phosphorus formulations mid-season: these encourage flowering (bolting), which is precisely what you are trying to prevent.
– Stop feeding 2 weeks before the first frost date in your region to allow any new growth to harden slightly before cold exposure.
Harvest Protocol: The Technical Logic Behind Pinching
Every harvest decision you make either extends or shortens your productive season. Here is the biology: basil produces flowers when it perceives that it has reached a certain developmental threshold (driven by day length and temperature signals). Once it sets flower and seed, essential oil production drops dramatically — the plant’s biochemical priority shifts from aromatic compound synthesis to seed development. Your harvest strategy is fundamentally about intercepting this process.
Correct Pinching Technique:
1. Identify a stem that has developed 6 or more leaf pairs
2. Locate the third pair of leaves from the top
3. Pinch or cut cleanly just above that third leaf pair node
4. The two nodes immediately below your cut will each produce a new lateral shoot within 5–7 days, doubling your branch count
Frequency: Every 7–10 days during peak growing season. Do not wait until you see flower buds forming — at that point, you are already behind. If you see the characteristic elongated internode stretch that precedes flowering, that stem needs to be harvested immediately regardless of your schedule.
Never harvest more than one-third of any individual plant’s total leaf mass in a single session. Below this threshold, the plant retains sufficient photosynthetic capacity to recover vigorously. Above it, you risk triggering stress responses that accelerate reproductive maturation.
Pest and Disease Troubleshooting Table
| Problem | Symptoms | Cause | Solution | Prevention |
|---|---|---|---|---|
| Fusarium wilt | Sudden wilting, brown stem discoloration at base | Fusarium oxysporum f.sp. basilici | Remove and destroy infected plants; do not compost |